Friday, May 18, 2018

Building Body Muscle - 5/18

                                           
http://www.kickassfacts.com/wp-content/uploads/2014/12/Muscles.jpg
When people are trying to build up their muscles, they are usually trying to exercise their skeletal muscles. Skeletal muscle is composed of thread-like myofibrils and sarcomeres that form a muscle fiber and are the basic units of contraction. The 650 skeletal muscles in the human body contract when they receive signals from motor neurons. Motor neurons tell your muscles to contract. Motor neurons are triggered from a part of the cell called the sarcoplasmic reticulum. The better your motor neurons do this, the stronger you can get. In addition the Motor Unit recruitment explains why certain movements become easier to perform after practice. This is because after you workout, your body replaces damaged muscle fibers. However these replaces muscle fibers are thicker than they were before. Muscle growth happens when your protein synthesis is greater than your muscle protein breakdown. Another component to the growth of your muscles, are Satellite cells. Satellite cells are precursors to skeletal muscle cells, able to give rise to satellite cells or differentiated skeletal muscle cells. When activated, Satellite cells help to add more nuclei to the muscle cells and therefore contribute to the growth of myofibrils (muscle cells). The more you activate satellite cells, the more you are able to grow. Lastly, continually putting more stress on the muscles is a major component involved in the growth of a muscle and disrupts homeostasis within your body.

S&EP - SP1: Asking questions and defining problems


I formulate testable questions when I researched the question, “how does the body build muscle?”. Upon researching this, I decided to specifically focus on teaching how the body strengthens its skeletal muscle. I established what is already known about this topic when I typed down any information I found, onto a note document. I shared this document with my partner so that we could collect information together. I determine what questions have yet to be answered when I read over the existing information on the note taking document and figured out what parts of the skeletal muscle building process that we were missing. I defined constraints and specifications for a solution as I realized that not all of the information we needed, was going to be provided on one single website. So the solution was for both my partner and I to research on several different websites that may contain more information.

Sunday, May 13, 2018

Stress 5/13


https://i2.wp.com/williamreview.com/wp-content/uploads/2018/03/feature.png?fit=788%2C430&ssl=1

Stress is a feeling of strain or pressure. Positive stress can be beneficial because it helps you focus and have more energy, resulting in a better performance. However, chronic stress is the response to emotional pressure suffered for a prolonged period of time in which an individual perceives he or she has little or no control. Chronic stress can affect the size of your brain, it's structure, and how it functions. When your body detects a stressful situation, your Hypothalamus Pituitary Adrenal (HPA) axis is instantly activated and releases a hormone called cortisol. High levels of cortisol over long periods of time can lead to negative affects. For example, electric signals in your hippocampus deteriorate and your hippocampus also inhibits the activity of your HPA axis, weakening your ability to control your stress.  Too much of the cortisol results in the loss of synaptic connections between neurons. In addition, cortisol can literally make your brain shrink in size and the shrinking of your prefrontal cortex, leads to fewer new brain cells being made in the hippocampus. This means that chronic stress can make it more challenging/difficult to learn and remember things. Finally, chronic stress prompts your brain for future psychological diseases. These serious mental problems include depression and eventually Alzheimer's. 

S&EP - SP2: Developing and using models

I constructed a mental or conceptual model to represent and understand phenomena when my end of year project group and I created an infographic to represent and understand multiple ways of how chronic stress can affect the brain. After studying this unit for a few days by watching videos, reading articles, and answering questions about this topic, we were assigned to craft an infographic to explain to others how traumatic events, such as natural disasters, impact the mind/brain. In addition, we had to include at least three coping strategies to deal with that stress. I used a model to explain and predict behaviors of systems, as my group and I created an infographic on Google Draw that predicts the behavior of the brain and how it functions under long periods of chronic stress. I refined/rebuild my model as I learned about more and more ways that chronic stress and high levels of cortisol can wreak havoc on the brain. Upon learning more about these negative affects, I had to move images and text around to make space to provide more information.

Sunday, April 29, 2018

Galaxies 4/29

http://www.nasa.gov/sites/default/files/thumbnails/image/image2stscihp1726bf4000x1750.png

A galaxy is a gravitational bound system of stars, stellar remnants, interstellar gas, dust, and dark matter. There are many different types of galaxies. This includes Spiral Galaxies, Elliptical Galaxies, Peculiar Galaxies, and Irregular Galaxies. Spiral Galaxies are characterized as broad, flat, rotating disks of stars, gas, and dust. It has a central bulge of older, redder stars, sometimes with a long cylindrical or rectangular bar of stars and a huge extending halo of older stars. The spiral arms extend from the very center out to the visible edge of the galaxy. Elliptical Galaxies is a type of galaxy having an approximately ellipsoidal shape and a smooth, nearly featureless brightness profile. Some are nearly spherical, gigantic cotton balls of billions of stars. Others are more elongated, shaped like cigars or American footballs. They tend to have no overall structure and range in size dramatically. Elliptical Galaxies are characterized by a lack of gas and dust in them, they are populated with older stars. Peculiar Galaxies is a galaxy of unusual size, shape, or composition. They are not shapeless, but have a shape that is weird. Peculiar galaxies are essentially all due to collisions. Irregular Galaxies are galaxies that do not have a distinct regular shape, unlike a spiral galaxy or an elliptical galaxy. They are truly shapeless. These galaxies tend to be small, and chaotically shaped.

S&EP - SP1: Asking questions and defining problems

I formulate testable questions when I scanned through the document that my classmates and I were assigned to fill out. When observing this document, I discovered that I was supposed to watch a video about galaxies and then answer questions that correlated with the video. I established what is already known about different types of galaxies and galactic collisions when I answered the questions as I watched the video. This helped me efficiently answer the questions once I discovered the answers to them. I determine what questions have yet to be answered when I looked over the questions on the document and figured out which questions I haven't found the answer to yet. I defined constraints and specifications for a solution as I realized that some of the questions required a little more detail in the explanations that the video may have not included. So as a solution, I decided to do some extra research in order to thoroughly answer certain questions.

Thursday, April 12, 2018

Project Blog 4/15


(This is an image of my instrument)

Summary
During this past unit, my science class has been learning about the different parts of a sound wave and how sound waves work. In order to understand how sound waves can make different pitches more significantly, my class was assigned to create a "one man instrument". A "one man instrument" is an instrument that contains a various amount of instruments in one, allowing the musician to simultaneously play a number of different instruments at a time all by them self. The premise of this project was that we were musicians that our teacher entered into a National One Man Show Competition. Given the situation, it was evident that this project would be individual. There were several requirements that we had to follow and keep in mind while making our instrument. The first requirement was that the instrument had to have three different types of instrument. This included a string, percussion, and wind instrument. In addition our instrument can't contain any real parts from musical instruments. The challenge of the project was that our instruments had to be "home made", meaning it had to be made with common materials/items we would find at our house. The pitch aspect of the project that helped us learn more about sound, was that each of our different types of instruments must be able to play three different notes on pitch and it will need to be loud enough to record the sound. Lastly, our instruments had to have an original and creative appearance, not replicating any existing instruments.

Backward-Looking
The process of creating my instrument was quite long. I began by brainstorming ideas of how I would create the string, percussion, and wind aspects of my instrument. I decided that my string would be sort of like the strings of a guitar, where I would strum the strings with my hand to create sound. Then I decided that my percussion would be sort of like drums, where I would use a stick to hit the surface in order to create sound. Finally I decided that my wind would be sort of like a flute, where I blow into a tube like structure to create sound. The next step was figuring out how I was going to put these instruments together into one. Something that helped was sketching out my visions of what I wanted my instrument to look like. Once I had a clear idea, I started gathering materials for my instrument prototype. This part was challenging because it was difficult finding substitution materials that replicated the sound of real instruments. In addition, they had to be items I could find and didn't have to buy. In the end, I found that rubber bands worked as my strings, a metal cover worked as my drum/percussion, and straws worked as my flute/wind. When building the instrument, I decided that a cardboard Ziploc bag box would be my base. As I constantly rebuilt and tested my prototype, I found ways to rearrange the parts and improve the sound of my instrument. After I finished with the final product, it was time for the test. The test consisted of recording the three different pitches of each part of my instrument, then answering a question to test my knowledge of what I learned during this unit.

Inward-Looking
I feel really confident and proud about this piece of work. I believe that my instrument is well made and thought through. The final product took a lot of work to make with all of the building and testing that I had to do in order to perfect my instrument. Some parts of my instrument that I particularly enjoy is the strings and wind part of my instrument. I really like the strings because when I strum the rubber bands, it actually sounds like those of a guitar. I like the wind because I managed to create a homemade pan flute out of straws. When I blow into the open end of the straws, it makes loud whistled sounds that are on pitch. I enjoy playing these parts of my instrument. However, the part that I enjoy about my instrument as a whole, is that each part of my instrument works well. Each part of my instrument, whether it be the strings, percussion, or wind, accurately replicate the sound of the real musical instrument. Of course this considers the given materials that I was required to use. The only part of my instrument that I didn't enjoy was the fact that my instrument was plain. I wish that I had decorated it or painted the base to cover the original design.

Outward-Looking
I didn't really create my instrument the way my classmates made their instruments. The final product of my instrument didn't look like the others. Most of my classmates made their instruments with the wind being a pipe. In my case, I used straws as my wind. In addition, those of my classmates who used pipes made their instruments revolving around it, where the pipe was the base of the instruments. However, I used a cardboard box as my base. After observing most of my classmate's final product instruments, I believe that I am the only person who used a cardboard box the way that I did. Some of my classmates also used a cylinder container, such as a pringles container, as their base. The similarities I had in my instrument that I shared with my classmates is that the wind aspect of my instrument was the same as many others. Those that didn't use pipes as their wind, used straws made into a pan flute or used straws to make a regular flute. Almost all of my classmates also used rubber bands as their strings. This is mainly because rubber bands were the only thing we could use.

Forward-Looking
Looking back at the final product of my instrument, the only thing that I would change or improve upon is the decoration. My instrument ended up looking quite unappealing. The glue and tape that held it together was clearly shown everywhere. In addition, I used a Ziploc bag box as the base of my instrument and the design of that was still shown on the outside of my instrument. With this in mind, I would definitely want to improve the appearance of my instrument. If I had a chance to do this project over again, I would keep all the functions and arrangements of my instrument the same, the only thing that I would change would be to take time to decorate the piece. I would probably cover the outside with paper or even paint it. This extra step would hide the original designs of the materials I used and would make my instrument look more professional, neat, and more attractive overall.

Sunday, March 25, 2018

Waves - 3/25/18

http://thescienceofwaves.weebly.com/uploads/2/5/7/8/25786734/1239513_orig.jpg

Waves involve the transport of energy without actually transporting matter. In fact, some waves require matter while other waves don't. In addition, there are two different types of waves. This includes Mechanical waves and Electromagnetic waves. A Mechanical wave is a wave that is an oscillation of matter, and therefore transferring energy through a medium. Mechanical waves can travel through matter in the form of a solid, liquid, or gas. An Electromagnetic wave is a wave that can travel through the vacuum of outer space, therefore Electromagnetic waves don't travel through the movement of molecules. Electromagnetic waves work by carrying transverse vibrations in electrical and magnetic fields. The obvious difference between the two types of waves is that Mechanical waves require matter to transfer energy because the wave travels from molecule to molecule, vibrating the matter and causing them to bump into each other. While Electromagnetic waves don't require matter to transfer energy given that the wave travels through vibrations in electrical and magnetic fields. 

S&EP - SP1: Asking questions and defining problems

I formulate testable questions when I observed the worksheet that was assigned to the class and read over the questions that I would need to answer. This worksheet contained articles and boxes where I needed to annotate the text. To annotate, I answered questions on the text that I read, wrote down notes that summarized the text, and wrote down connections or questions that I had. I established what is already known about the articles and text that I read by answering the questions that were being asked when I found the answer and wrote down annotations about the text in the boxes provided. I determine what questions have yet to be answered when I looked back over the questions on the worksheet and figured out what questions I hadn't found the answer to yet or the questions I was confused on. In addition, by going through the packet once more, I could see which boxes I didn't fill and add on to previous things I had written.

Sunday, March 11, 2018

Sound - 3/11/18

http://www.soundproofingcompany.com/soundproofing101/what-is-sound/
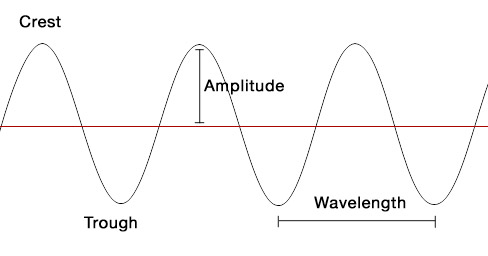
Sound is a vital part of life on Earth. Sound is everywhere, it surrounds us whether we prefer it or not. But have you ever took a second to deeply analyze sound and where it comes from? How it travels to your ears? How do sounds, sound different? Well to start off, Sound is a type of energy made by vibrations. These vibrations that travel through the air or another medium, can be heard when they reach a person's or animal's ear. In addition, vibrations are caused by the movement of air particles. These air particles bump into the particles close to them, which makes them vibrate. Thus causing them to bump into more air particles. This movement of air particles is known as sound waves. The process of vibrations in sound waves keeps going until they run out of energy. Now let's talk about the different parts of a sound wave. The highest point on a wave slope is referred to as the crest. The lowest point on a wave slope is referred to as the trough. A sound wave can be measured by its amplitude. The amplitude is the distance from the middle of a wave slope to either the crest or the trough. Lastly, the length between the same exact point on two waves is referred to as the wavelength. How you hear the sound, is if your ears are in range of these vibrations. Sound waves can create different sounds depending on the frequency of its vibrations. When the vibrations are fast, it gives off a high note when heard by your ears. In contrast, when the vibrations are slow, it creates a low note when heard. The frequency is another way a sound wave can be measured.

S&EP - SP3: Planning and carrying out investigations

I identified questions to be investigated when I asked which bottles filled with different amounts of water, would make a sound that is more high pitched or low pitched. In addition, I asked this question to determine the order in which the bottles would be placed from highest pitch to lowest pitch. I asked these questions for both experiments. The experiments included tests of making sounds by blowing across each bottle and hitting each individual bottle. I identified my variables and controls of the experiments. The controlled variables were that all bottles in the experiment were almost identical (all being glass bottles of the same size and the same shape), all bottles were being blown across or hit the same way, all bottles were filled with water, and all bottles were set on the same surface. The manipulated variable is the different amounts of water in each bottle because no bottle had the same amount of water, some had more or less water than others. I designed and performed experiments to test my hypotheses. I thought that the bottles would have the same reaction with pitches in both experiments and the evidence I tested did not support it. My evidence proved that with the first experiment, the more water in the bottles made the sound more low pitched when being blown across. On the other hand, in the other experiment the more water in the bottles made the sound more high pitched. The reason being is sound travels faster through solids or liquids than air. So when the bottle is hit, the water is being vibrated and sound travels faster. But when the bottle is blown across, the sound is reflected off the water and is caused by vibrations in the air molecules.

Monday, February 26, 2018

WAC: Is Music in the Classroom a Distraction or Study Tool? - 2/30/18


Ariel Thongkham
Science 8A
Mrs. Redifer
2/30/18

Is Music in the Classroom a Distraction or Study Tool?

          In this day and age where technology has become essential to society as a whole, it seems that every student has access to a mobile device. Access to a mobile device gives students the capability to easily obtain music softwares, such as iTunes, Spotify, Pandora, etc. This privilege that students possess, encourage the integration of music in the classroom. Currently, students and teachers have found creative ways to use music as a study tool. Music is able to change the way you feel, which acts as an advantage while you are studying. When it comes to teaching about the past, an American History teacher found it helpful to play music from the era her students were studying. The music affected her students' emotions in a way that helped them deeply connect to the era on a spiritual level. In addition, she discovered that classical music changed her students' emotions by making them calm and focused on their work. Certain genres of music can also stimulate your mood, which results in a better performance. When students are feeling fatigue, they tend to be too tired to complete assignments to the best of their ability. However, when listening to certain music that boosts their energy with excitement, it can cause them to do work to their fullest potential. Although music is very beneficial to student learning, it is important that students are listening to the right music while studying.

            Do particular genres of music change the way you feel? Music has the ability to affect your emotions in a way that can be beneficial to student learning. An article titled "Music in the Classroom: Distraction or Study Tool" discusses an interview with American history teacher, Katie Chester, at Empire High School in Tucson, Arizona. Upon being asked about her thoughts of music in the classroom, Ms. Chester responded by saying, "For history, we do music of the time period to get a more emotional look at the era. Plus classical stuff helps [the class] calm down and focus". When Ms. Chester's 5th period American History class was learning about the 50's era, she played music from the 50's era while they were studying. She discovered that as the students listened to music from the era they were studying, it helped them become more spiritual toward the era and even have a deeper connection to that time. As a result, students were more eager and wanted to learn which helped them get a better education. In addition to this, when students weren't learning about a different era with predominantly different music, Ms. Chester played classical music for her class. Classical music brings tranquility to the classroom which aids the class to calm down. Thus encouraging them to focus on what they are doing.

            Along with affecting your emotions, listening to the right song can stimulate and help boost your mood, essentially causing you to ameliorate your performance. According to the article titled, "Music in the Classroom: Distraction or Study Tool" it states that, "When you hear something you like, it heightens your arousal and mood, which improves performance". Especially with pop culture and up beat songs, people tend to have uplifted excitement upon listening to them. This increase in energy can be so critical to student performance. For example, if students are taking a test or completing an assignment with fatigue, it can greatly effect their performance. Most times when students and people in general feel lethargic, they don't want to do anything and incline to give up on what they are doing. In addition, feeling tiredness also results in the person not concentrating on tasks they need to complete. However if they listen to songs that enliven their spirits, they'll become more energetic and will be motivated to finish the task at hand. Plus, being more awake with a positive mood always helps you focus. So it is important for students to tailor the correct song for studying. Their personal, ideal song should activate their emotions in a way that makes them feel more cheerful and alive. Furthermore, it should inspire them to concentrate and complete what needs to be done.

            The opposing side of this argument believes that music acts as a distraction rather than a tool in the classroom. In an article titled "Why You Shouldn't Listen to Music While Studying" it explores research and tests taken by the University of Wales Institute that discovered, "Participants performed worst while listening to music, regardless of whether they liked that music". Researchers instructed 25 participants to memorize, and later recall, a list of letters in order. Participants were tested under various conditions that include listening to quiet music, music that they said they enjoyed, music they said they didn't enjoy, a voice repeating the number three, and a voice reciting random single-digit numbers. The results of the study led to the idea that "Music may impair cognitive abilities when you're trying to memorize things in order, because you may get thrown off by the changing words and notes in your chosen song". Although studies do prove this claim to be true, previous studies have found benefits to listening to music before performing a task.  In the same article "Why You Shouldn't Listen to Music While Studying" it says, "Listening to background music prior to task performance increases cognitive processes, such as attention and memory, through the mechanism of increasing arousal and positive mood". So while lyrical music may be a distraction to some when engaging in a task, listening to music before engaging in a task is helpful. In addition the research only supports how lyrical music affects your memorization. Thus leading to the idea that listening to music while completing tasks not requiring memorization, may be fine.

             The escalation of mobile devices and access to online software or applications, has given students the privilege to listen to music in the classroom. In order to use music as a study tool, it is essential that the proper music is played for it to be beneficial in student learning and performance. For music that is played in the classroom, classical songs tend to make students serene. Moreover, classical music makes students focus on what they need to accomplish. If students are learning about times of the past or different cultures, it is helpful to play music of the era or culture they are studying. Listening to this type of music, assists students to have emotional look on what they are learning and have a deeper understanding. Students are able to focus, connect, and understand the material they are being taught depending on different genres of music, because music is able to change your emotions. Adding on to this idea, certain genres of music can change the way students feel by increasing their arousal and mood. Upon listening to pop songs, student energy levels correlate with the upbeat tunes. This can be necessary when students are feeling too tired to complete work to the best of their ability. However, pop and upbeat music can help awaken these students and as a result, they will put their full potential to the task at hand. Recent studies show that lyrical music acts as a distraction while memorializing material. Instead, it is more advantageous to listen to lyrical music before performing memorization tasks. Lastly, students should tailor music that works for them. No matter what research proves, it is important that students listen to music that genuinely helps them in the classroom.

Thursday, February 15, 2018

Roller Coaster Project Blog 2/18


Summary
        Over the course of a month, students engage in a physics unit where they learned about what happens when an object goes into motion and how that object is able to move. This unit had various topics that students learned about such as basics of motion, distance and displacement, speed and velocity, acceleration, energy, forces, and Newton's three laws of motion. To thoroughly understand and get a deep learning of these topics, students were assigned to complete worksheets, documents, and labs for each topic. Once all the hard work was done, the last step is a fun project that allows students to create their own roller coaster. When putting together the roller coasters, students needed to review their knowledge of each topic when calculating the physics of their roller coaster.

Backward-Looking
        Students started off this physics unit by completing worksheets, documents, and labs on each topic. Depending on the score that students received for these assignments, they were given a correlating amount of coins.These coins come in handy for the final part of this unit. The final step of this unit is a project where students build their own roller coaster. Students were put into groups of four to complete this project. The amount of coins earned earlier were accumulated together to let groups know how much materials they were able to buy for their roller coaster. My group first created a sketch of our vision for what we wanted our roller coaster to look like. Then we bought the amount of materials we needed in order to make this design a reality. The materials my group bought were twelve feet of piping for our track, one wooden dowel to hold our roller coaster up, hot glue/tape to hold it together, and a marble as our cart. As my team put each aspect of our roller coaster together, we constantly tested our design by running the marble down the course to make sure that it stayed on the track. In addition, these tests helped us ensure that there was enough acceleration for the marble to go through each loop, turn, and hill properly. Once we were satisfied with our roller coaster, we calculated the speed/velocity, distance and displacement, kinetic and potential energy, and acceleration. At this time we also labeled where the topics we had studied, took place on the coaster.

Inward-Looking
        I feel proud of this piece of work that my group and I have built. The reason for this feeling is because my group was able to create a roller coaster that actually works and is consistently functional. The marble is able to go through the course without falling off the track and the marble is able to go through each loop, turn, and hill with enough acceleration. In addition, my group has made a roller coaster that I would actually enjoy and want to ride if it were to be life size. I enjoy how it has the thrill factor with the speed and actions of the course. However although I enjoy this roller coaster that my group created, there are a couple of things that I don't particularly enjoy. The first dislike being that our roller coaster doesn't have any theme. Most roller coasters in real life have a theme to make it look interesting, yet my group didn't have enough time to decorate our roller coaster. The second dislike I have is that our roller coaster isn't very sturdy. When we run the marble down the course, the coaster shakes a bit and requires on a certain type of lighter marble in order for it to work. If the marble is heavier, it will weigh down the track and fall of.

Outward-Looking
         The roller coaster my group made is somewhat different than the roller coasters that other groups made. My group did not design our roller coaster the way other groups designed theirs. Although all roller coasters were different, some were more alike than others. Most groups started their roller coaster off with a vertical loop after the drop. However, my group decided to start our roller coaster off with a horizontal loop that kind of resembles a spring, after the drop. The other difference is that my group's roller coaster had two loops in a row while other groups designed their roller coasters to have only one loop. The last difference is that my group stopped our marble different than other groups. We folded our piping into itself to create a cave like end. Then we stuck a wad of tape in the cave that abruptly stopped the marble as the coaster came to an end. An obvious similarity between my group's roller coaster and the other coasters is that all groups made their coasters out of the same type of materials. These materials included the Styrofoam piping, wooden dowels, a board as a base, hot glue, tape, and a marble. Another similarity is that all groups had to include a loop, turn, and drop in their roller coaster and all groups were forced to start with a big drop to create enough acceleration for the marble to go through the course.

Forward-Looking
        As I look at my group's roller coaster, there are a few things that I would like to improve upon. As I've stated before, our roller coaster has no theme. This is crucial because without any decoration to the roller coaster, it takes away any attraction or interesting factor to our coaster. As of now, the roller coaster is just plain and quite boring. When we first designed this roller coaster, my group based it off of the idea of traveling places in different areas of the world. This idea gave us the name, "Around the world in three seconds". We wanted to include a Styrofoam ball that we would paint to look like the Earth, in the center of the base as the coaster loops around it. However, we decided to drop this idea as we realized we didn't have enough time to execute this design. In addition, we didn't want to spend extra money on the outside materials that it required. Yet now that I see the final product, I wish that my group stuck to this idea or at least gave it a theme and attempted to decorate it. The next thing that I would improve is making the roller coaster more sturdy. I wish that my group gave more support to our roller coaster by gluing more dowels to hold it to the base. Since we didn't do this, our coaster can only handle the lighter marble and even then it shakes when we run the light marble down the track.

Monday, February 12, 2018

Forces 2/11

http://s3-ap-southeast-1.amazonaws.com/subscriber.images/physics/2016/06/14051038/Force.jpg
Forces can change the speed of something, the direction it is moving in, or its shape. A force can be a push or pull on an object. For example when you push a door open, you need to apply force to the door. In addition when you pull open a drawer, you need to apply force to the drawer. Balanced forces is when two forces acting on an object are equal in size but act in opposite directions. For example if the force of a rope is pulling a crate up and the weight of the crate is pulling the crate down at the same force, this is a balanced force. Unbalanced force is when two forces acting on an object are not equal in size. For instance, when someone is pushing a table with more force than the person who is pushing the table in the opposite direction. When two or more forces are acting on an object at once, the result is the combination of forces or combining forces. When two forces are acting in the same direction, the net force is the sum of the two individual forces and the object will move in the direction of the forces applied. When two unequal forces are acting in opposite directions, the net force is the difference between the two individual forces and the object will move in the direction applied by the larger force. Finally, when two equal forces are acting in opposite directions, the forces cancel each other out and the object will not move.

S&EP - SP1: Asking questions and defining problems

I formulate testable questions when I read over the "Forces" document that I was assigned to complete. On this document, there were questions that I needed to answer about forces. I established what is already known about forces by answering the questions that I knew the answer to. Once I found the answer to each question, I wrote the answer. I determine what questions have yet to be answered when I went over the document and figured out what questions I hadn't answered yet. I read over these unanswered questions and did my best to find information in order to answer them. I defined constraints and specifications for a solution as I realized that certain questions on this document required information that wasn't stated in the provided videos or articles. These certain questions needed to be answered with my own knowledge on the topic.

Friday, February 2, 2018

Newton's Laws of Motion 2/4/18

https://upload.wikimedia.org/wikipedia/commons/1/16/Newton_3.jpg

Isaac Newton has created three laws to explain how forces make objects go in motion. Newton’s first law is known as the law of Inertia. This laws states that moving objects don’t spontaneously speed up, slow down, or change direction. An example of Newton’s first law is that if a bicycle is at rest, without force it is going to stay at rest. Newton’s second law states that force is the product of mass multiplied by acceleration. A more in depth definition of Newton's second law is in order to cause an object to accelerate, a force needs to be applied that is proportionate or larger than the mass of the object. This law also explains that the more force applied, the quicker the object accelerates. In addition the more mass there is in an object, the more force you need to apply in order to accelerate the object. An example of Newton’s second law is that if a bicycle is carrying a large amount of mass, the person pedaling will need to apply a large amount of force in order to make the bicycle accelerate. Newton’s third law is explained as, for every action, there is an equal and opposite reaction.
An example of Newton’s third law is the action is when you drop a bouncy ball and it creates a downward force hitting the ground. The reaction is when the floor reacts by pushing the ball the same force but upward, causing the bouncy ball to bounce back up.

S&EP - SP3: Planning and carrying out investigations

I identified questions to be investigated when I asked how each short lab represented each of Isaac Newton's three laws of motion. For the second lab that tested Newton's second law for motion, I identified my variables and controls. The controlled variable were the length of the track, the height of the ramp, and the starting positions of each marble. The manipulated variables were the mass of the marbles. There was one smaller marble and one larger marble that would be tested. I designed and performed experiments to test my hypotheses for the second lab that represented Newton's second law. I thought that when we released the smaller marble with less mass down the ramp, it wouldn't make the larger marble go in motion when they came in contact, and proved the opposite. The smaller marble did make the larger marble move, however the acceleration was very slow because it wasn't enough force.

Saturday, January 20, 2018

Acceleration 1/21/18

Image result for velocity vs time graph
http://s3.amazonaws.com/answer-board-image/6f39d490-ea4e-44d9-b1e1-93f06ce49314.jpeg

Acceleration is the increase in the rate of speed of an object's motion. In physics, acceleration is the rate of change of velocity of an object per unit time. Acceleration measured two changes, the change in position of an object and the change in velocity of an object. An example of acceleration is when an object speeds up. To find the acceleration of an object's motion you need to follow a certain formula. The formula for acceleration is velocity divided time or more specifically the difference between the velocity final and velocity initial, divided by time. If the acceleration you have found is a negative acceleration as the numbers turn out to be negative, then this is called a deceleration. You will usually have a deceleration when the velocity final is smaller than the velocity initial so when you subtract and divide, the numbers are negative. An example of deceleration in an object is when an object slows down. Once you have found the acceleration with this formula, the units for acceleration is m/s^2 which is the measurement unit per second squared.

S&EP - SP3: Planning and carrying out investigations

I identified questions to be investigated when I asked what the velocity of the hot wheels car would be at 1 seconds, 2 seconds, 3 seconds, and 4 seconds. I asked these questions when the height of the hot wheels ramp was at one book, two books, and three books. I identified my manipulated variables which were the height of the hot wheels ramp. We changed this variable by adding more books under the ramp to make the ramp steeper. The controlled variables of this experiment were the same hot wheels car, the same ramp, the same timer, and the same units of time and measurement. I designed and performed experiments to test my hypotheses. I thought that the hot wheels would have a larger acceleration when the hot wheels ramp was steeper, and proved this by testing and finding the acceleration of the hot wheels velocity when going down ramps with different heights. These heights include one book, two books, and three books. I decided to collect the measurement of the hot wheels car at 1 second, 2 seconds, 3 seconds, and 4 seconds, this is the position of the car at different times. I chose to collect this data so I could calculate the velocity of the hot wheels car and eventually the acceleration.

Sunday, January 14, 2018

Speed and Velocity - 1/14


Image result for speed and velocity
https://byjus.com/physics/wp-content/uploads/2015/12/velocity.jpg

Speed is the rate at which an object covers distance. Velocity is the rate of the distance traveled by an object per unit time in a particular direction. The difference between speed and velocity is that speed has doesn't require direction while velocity is speed with a given direction. This is why speed is a scalar quantity and velocity is a vector quantity. An example of speed is "the car traveled 25 m per second". In addition, an example of velocity is "the car traveled 25 m per second east". Since both speed and velocity require the rate at which an object covers distance per unit time, they share the same formula. The formula to calculate for speed and velocity is speed or velocity = d/t. D/t stands for distance divided by time. So in order to find the speed or velocity of an object's movement, you need information on the total distance traveled by the object and the amount of time it took the object to travel that distance. The unit for speed is usually m/s or meters per second and the unit for velocity is usually m/s direction. Speed and velocity can be graphed on a position vs. time graph.

S&EP - SP1: Asking questions and defining problems

I formulate testable questions when I read over the questions on the "Speed and Velocity" document that was assigned. I needed to answer these questions about speed and velocity in order to complete this document. To answer these questions, I needed to read the correlating article and research the information. I established what is already known about speed and velocity when I answered the questions and typed them down on the document. I determine what questions have yet to be answered when I looked at the remaining questions I still haven't answered or when I looked at the questions that I couldn't find the information for. I defined constraints and specifications for a solution as I realized that I couldn't calculate and solve for speed or velocity without knowing information about the distance and time of the object's movement. I needed to know the total distance the object traveled and the amount of time it took for the object to travel this distance. The reason I needed this information is because the formula for speed or velocity is distance/time.

Friday, December 15, 2017

Project Blog: Charity Fair - 12/17


Summary
Charity Fair is the most complex project of the year because it stretches out to every class. Students had to complete tasks and learn new skills in each class, that relates to their product or charity. In social studies, students researched and learned information about the organization they support. Including the charity's mission, story, and how many they have affected on their journey. In math class, students learned the profit they would make by selling their product, the price of their product, and how much it would cost to produce their product. In addition, students learned the charity statistics, such as how much money the charity makes per year and what percentage goes to the cause. In science, students learned the mode of transportation to ship each material that contributes to the creation of the product. In engineering, students learned how to create an instructable and backboard for the project. Lastly in language arts, students learned how to put together an ignite presentation to efficiently advertise their charity in exactly 2 minutes.


Backward-Looking
During this year's annual Charity Fair, students were put into groups of 2 to 3 among the peers in their class. The priority of Charity Fair is to find a charity or organization that you truly care about and sell products to raise money for that charity. To find the ideal charity, each group had to research the different organizations that supports their topic in social studies. Based on observing the charity's ratings and mission, students were able to make a decision about what charity best suites their outlook. This leads to the final choice of the certain charity the group is willing to support/advertise throughout this project. Next, groups had to decide what product they are going to sell in order to raise money for charity. This product has to have some correlation to the group's charity. Once the product is approved, students had to create a Cost & Profit and Statistics document in math class. In addition, students created a google map in science alongside a Carbon Footprint document. Meanwhile in engineering, students had to make an online instructable that would be pasted on a backboard that is also created in that class. To finish it of, students created a quick ignite presentation containing only photos, to influence students/teachers to vote for their charity.

Inward-Looking
Going into this project, I had many standards for myself as well as my group. Since I am currently in 8th grade and this is my last year of Charity Fair, I knew exactly what to expect. So I had many expectations and goals to hopefully accomplish. The first expectation was for my group to choose a charity that we really care for. The main reason for Charity Fair is to raise money for a worthy cause. It is very important that the charity you are advertising speaks volumes to you and that you are passionate about the topic. Another expectation was for my group to get work done efficiently and on time. After years of doing the same type of work for this project, we should know how the assignments are expected to be completed and what to do for them. In addition, we should know the amount of work that needs to be done for Charity Fair, therefore we should be able to split the work up equally so that it is turned in on time. The last expectation I had was for each group member to memorize their lines for the ignite presentation. At our age, we should be setting a good example to the younger students presenting. It is unprofessional to be reading from a script.

Outward-Looking
The one thing I would like people to notice or take away from my group's project is how hard we have worked on it. It has taken so much time and effort to complete each assignment for Charity Fair. There were several different tasks that needed to be done at the same time and for different classes. The amount of work for this project was overwhelming and took dedication to complete. In addition, to create the products we sold at Charity Fair, my group had to stay extra hours at each other's houses to make each item perfect. My group sold gingerbread house kits so it definitely took a while to create each component of the kit. The gingerbread was very difficult to bake because the shapes had to be cut neatly and the dough needed to be at the right thickness or else the cookies would break too easily. It took several tries to get the outcome that we wanted. The same trial and error situation happened with the icing as it needed to be the right ratio of ingredients in order to create a consistency that was strong enough to hold the house, yet would pipe with ease.

Forward-Looking
Looking at the final outcome of this year's Charity Fair, I would only like to change one thing if I had the change to do this project over again. This one change would be to create more of my group's product. In the past, it always took a good amount of time to sell all of my group's product. However this year it only took the first five minutes for my group to sell out. Once all of the products were gone, there was nothing to sell and no more money could be raised from my group's stand. This quick sell out is due to the mistake of making only ten products. Although each item was very difficult to create because of the complexity of each component put into the product, I still believe that we could have at least made a few more products. Therefore making fifteen in total. This would give others who were looking forward to our product, a chance to buy one. It would also allow my group to raise more money for the chosen charity and contribute to its donations.

Sunday, December 3, 2017

Carbon Footprint 12/3

https://housebuyers4u.co.uk/wp-content/uploads/2016/01/co2.jpg
A carbon footprint is historically defined as the total set of greenhouse gas emissions caused by an individual, event, organisation, or product, expressed as carbon dioxide equivalent. A simplified definition of carbon footprint is the amount of carbon dioxide that is released into the atmosphere when certain items are shipped around the world. Shipping these items helps companies gather the materials they need in order to create products that are sold in stores today. It is important for companies to know what their carbon footprint is because depending on how far the items are shipped, it could effect the environment crucially. In addition, the length of how far the items travel can determine how much money it costs to ship the items. To calculate the carbon footprint, you have to find out how far it takes each material to ship from the manufacturer's to the factory where your product is built or sold. First, you have to consider what possible mode of transport should be used to ship each material. If the manufacturer is in the same country then a truck should be used. If the manufacturer is in the same continent then a train should be used. If the manufacturer is in a different continent then an airplane should be used. Then you find out how many miles each item travels and convert those miles to the amount of CO2 that is released depending on the mode of transport.

S&EP - SP2: Developing and using models

I constructed physical, mental or conceptual models to represent and understand phenomena when I created a google map with my group to represent the location of each material needed to create our product for Charity Fair. I used models to explain and predict behaviors of systems, or test a design as I marked the locations of the manufacturers or where each material was made. Then we marked the location of the retailer or where we bought each material. Next, we connected the manufacturers to the retailer with the line tool as we decided the possible mode of transport for each material. Lastly, we found out how many miles the materials traveled and converted the amount of miles to the amount of CO2 that would be released when each material is shipped. I refined/rebuild my model as I learned that each location needed to be marked with their own individual icon.

Tuesday, October 31, 2017

Common Descent 11/5

https://upload.wikimedia.org/wikipedia/commons/1/14/Hadrosaur-tree-v4.jpg
Common Descent describes how, in evolutionary biology, a group of organisms share a most recent common ancestor. Charles Darwin came up with this theory to explain how all species have evolved from one species, over time. Scientists can find out if organisms of different species have a common ancestor by looking at their homologous structure. By comparing the similarities and differences in the bones of organisms, you are able to make connections between the structures of the individual species. Darwin's discovery is supported by Embryological evidence. Embryological evidence proves that all animals developed from a common ancestor. An embryo is the early stages of development in a multicellular organism. Through observation of several organisms, you are able to distinctly see that the embryos of each species all look almost identical.

S&EP - SP1: Asking questions and defining problems

I formulate testable questions when I observed the document that we were required to do in class, and read what questions I needed to answer in order to complete this document. I established what is already known about common descent and the theory that all organisms originated/evolved from a common ancestor by writing down all of the information I found when investigating the provided website that correlated with the questions. I determine what questions have yet to be answered when I went over the document and saw which questions I haven't answered or found the information for. I defined constraints and specifications for a solution as I saw that some questions required information that wasn't in the provided website. I had to answer those questions with the knowledge I already had.

Sunday, October 29, 2017

Elephant Adaptations 10/29


http://s4.thingpic.com/images/54/uQLiTKXMXKApPTwDyG8rez9L.jpeg
Throughout generations, elephants have grown to help their species be more fit in the environments they are native to. In order to live the savannas of Africa and Asia, elephants have adapted traits to help them thrive in these harsh conditions. The three main features of an elephant that are key to their survival in the savanna are their trunk, tusks, and gigantic ears. An elephant's trunk is a (at most) 7 foot long appendage that contains 40,000 muscles. The trunk can help elephants drink water by sucking up water and spraying it into the elephant's mouth given that elephants aren't able to bend down to reach the water source. In addition, the trunk can spray water onto the elephant's body to keep them cool in the heat or can fling dirt over the elephant's back to protect from the sun and biting insects. To help elephants obtain and eat their food, the trunk can pick up food, gather food, and grab food from higher areas such as tree branches. An elephant's tusks can develop up to 11 feet long to help them dig for water in times of drought, strip bark from trees to eat, lift objects, fight, and defend. The tusks also protect the sensitive trunk. Elephants have large ears that have an extensive supply of blood vessels so they can flap their ears to create air currents across the ears. These air currents reduce excess body heat.

S&EP - SP2: Developing and using models

I constructed physical, mental or conceptual models to represent and understand phenomena when I created a cartoon comic strip to explain the adaptations that elephants developed to survive in the savanna. I used models to explain and predict behaviors of systems, or test a design as I wrote a story line that follows a tour group driving through the savanna to explain elephant adaptations. Along their journey throughout the savanna, this tour group learns about the different parts of the elephants body that helps it survive on a daily basis. I refined/rebuild my model as I learned about more of the different abilities that the trunk, tusks, and ears of the elephant does to help the elephant be more fit for the savanna environment.

Friday, October 20, 2017

Natural Selection - 10/20

https://involutedgenealogies.files.wordpress.com/2015/03/lulz.jpg
Natural Selection is the process where organisms better adapted to their environment tend to survive and produce more offspring. However, the organisms that are unfit for the environment struggle and don't survive. To put the definition more simply, Natural Selection is known as "survival of the fittest". The theory of Natural Selection was first fully expounded by Charles Darwin and is now believed to be the main process that brings about evolution. This process happens when there is a variation of traits in the population. Therefore, the traits that have most advantage in the environment would thrive while the other unfit traits would die out and disappear in the population. This action would result in the population of species adapting to their environment as the environment changes overtime. An example of Natural Selection is when there are green and brown beetles in a population. Over generations, the green beetle trait dies out and disappears in the population. The reason being is that the green trait is not fit for the environment because the green beetles are not able to camouflage in the dirt. The brown beetles however, are able to camouflage in the dirt. The brown color trait becomes more common in the population because the brown beetles are able to survive/thrive and the brown trait has more advantages in the environment.

S&EP - SP7: Engaging in argument through evidence

I use evidence to defend my explanation. I answered and filled out a guided notes document about the theory of Natural Selection. When completing this document, I provided a couple of websites about Natural Selection as evidence. These websites were assigned to the guided notes and I had to use these resources in correlation to the questions on the document. I formulated evidence based on solid data when I stated that Natural Selection allows species to adapt to their environment and evolve. To support this statement I used the fact that throughout the process of Natural Selection, the traits with the most advantage in an environment survive and thrive while the trait with the least advantage die out and disappear from a population, as evidence. This proves that as the environment is changing, the phenotype of the species in a population are changing to, in order to adapt to their environment. I examined my own understanding in light of the evidence. I used to think that the process of Natural Selection was random. However, because of completing the guided notes activity and answering the questions on the document, now I think that Natural Selection is the process in which random evolutionary changes are election in nature in a consistently, orderly non-random way. This is because through the process of common descent with modification, new traits are randomly produced. Nature then carefully decides which of those traits to keep or which of those traits get to survive. Positive changes add up over multiple generations and negative traits are quickly discarded.

Saturday, October 14, 2017

Genetic Drift - 10/15

http://www.oceangrownseeds.com/wp-content/uploads/genetic-drift-2-300x208.jpg
Genetic Drift is a mechanism of evolution in which allele frequencies of a population change over generations due to chance. Genetic Drift is a random process that can lead to large changes in populations over a short period of time. It is when important genes are not passed on to the offspring. There are two different ways Genetic Drift can occur. These two major types of Genetic Drift are the bottleneck effect and the founder effect. The bottleneck effect occurs when there is a disaster of some sort (such as a natural disaster or predator) that reduces a population of species into a small handful of species. This small handful of species rarely represents the actual genetic makeup of the initial population. This leaves smaller variation among the surviving individuals. An example of the bottleneck effect is when there is a population of beetles. A predator invades the territory of this beetle population and wipes out part of the population. This means that the traits in the genetic makeup of the beetle population that was killed, is gone. Therefore, these lost traits won't be passed on to the offspring of next generations. The founder effect is the loss of genetic variation that occurs when a new population is established by a very small number of individuals from a larger population. An example of the founders effect is when a small population of beetles left to find new land. A variety of these beetles left so their genes and traits are taken away from the original population. In result, these traits won't be passed to offspring in next generations of the original population.

S&EP - SP4: Analyzing and interpreting data

I used a table or spreadsheet to display and analyze data while performing a lab in class. I recognized patterns in data and see relationships between variables. For example I observed that after the Genetic Drift, all traits in the original population of M&Ms or colored candius were changed. No amount of traits or colors in the original population stayed the same after the Genetic Drift. I revised my initial hypothesis when the data doesn’t support it. My original hypothesis was that some of the traits in the original population of the colored candius would be completely lost while some traits would stay the same amount after the Genetic Drift. But my new hypothesis is that all traits in the original population of the colored candius will change after the Genetic Drift.

Friday, October 6, 2017

Project Blog - 10/8


Summary:
The Geologic Time Scale is a system of chronological dating that relates geological strata to time. This system is used by geologists, paleontologists, and other Earth scientists to describe the timing and relationships of events that have occurred during Earth's history. Our assignment was to create a interactive display that shows information about the Geologic Time Scale. In order to do this, the class was separated into groups of three or four. Each person of the group is responsible for researching one era of the Geologic Time Scale, including the Precambrian era, the Paleozoic era, the Mesozoic era, and the Cenozoic era. Once each member has completed their research on each topic and aspect of their specific era, the group will collect all of their information and come up with a way to display their project. My group decided to put our project on a tri-fold poster. We would provide the information about each era on little flaps that people can flip up and read information on. Each flap contains a different fact about each era.

Backward-Looking:
The first step in completing this process is researching the information about each era in the Geologic Time Scale. The era I chose to research was the Precambrian era, which is the first era that occurred in the history of Earth. After each member was assigned a specific era, we needed to research several different topics about the eras. This included, the periods in which the era is separated in, what the climate was like during this time, the geological aspects of the era (such as the oceans, mountains, volcanoes, etc.), the continental positioning during this era, the plants that thrived, and the animals that walked the Earth. Once each member of my group completed their research, we started brainstorming ideas on the actual project display. We found that the most cost efficient way of creating a display was to use one of the tri-folds that were provided by our teacher. We decorated the tri-fold by dividing it into four sections for each era. Then we painted each section a color that represented each era. We painted the Precambrian red, the Paleozoic blue, the Mesozoic brown, and the Cenozoic green. Next we wrote the titles for each era on panels that would pop out on the tri-fold. In addition, we decided to make our project interactive by cutting out flaps of color coordinated construction paper and write facts about each era on the corresponding color of construction paper. For final touches, we glued on images/drawings of the plants and animals on the section of the era where they occurred. This step helped make the display less more full and colorful.

Inward-Looking:
When creating this piece of work, I set many goals for my group. An important part of collaborating on a project is to be organized. Our way of organization was planning on what needed to be done and when things needed to be done. The main objective/goal of the project was for my group to put together an interactive display that holds information on each era of the Geologic Time Scale. As we began our research, the first goal was for each member of the team to complete at least the first three questions of the research worksheet on the first day, then finish the next three questions on the second day, and so on. This way we would all be done with the research on schedule with enough time to work on the display. The next goal was to find a way to display the information in a way where it would be interactive and appealing. After talking about potential ideas, we finally found the perfect way to display our project that fit with the design we wanted to present. Other goals my team set were to finish all of the painting of the tri-fold in one day, to finish the titles on the next day, to finish writing all of the information on the flaps on the day after, and to finalize the project by gluing everything on the tri-fold on the last day. As you can tell, our goals constantly changed throughout the process of this project. It all depended on what we accomplished and what we needed to accomplish.

Outward-Looking
If I were to give this project a grade, I would give it an A. I  believe that this piece of work should receive such a high grade because it has exceeded every standard of the project. When looking over the instructions for the project, I reviewed my project to make sure that my group followed all of the directions. The instructions to complete the project were to create an interactive artifact that accurately illustrates the eras that occur in the Earth’s history. Then we would get together with three other geologists which are the other members of your group, and compile all your work into one geologic time poster to present to the client which is the class. My group followed all of these steps in the process of creating our project. In addition, I believe that this grade is deserved because our project was original and creative. Nobody else in our class did their project the way we did ours. Our project was also very organized and appealing. The poster was organized into neat sections and we decorated the poster with a variety of colors, fonts, and colors. 

Forward-Looking;
If I had the chance to do this piece over again, I would only change one thing. In this revision, I would improve the lettering on the poster. I would make the lettering of the facts on each flap of information a little bigger. When presenting our poster to our "client", which is our class, the only criticism we received was that the facts were a bit difficult to read considering the size of the writing. When our clients read the information, they needed to look up close to the poster in order to be able to read the facts correctly. This is why the size of the writing is the only thing I would change about the poster. I believe that everything else on the poster was made to the best of my ability as well as my group's highest potential. So I wouldn't change anything else on the poster even if I had another chance to do the project again next time.